Rubber Plant Care for Beginners: Your Questions Answered
Rubber Plant Care: The Ficus elastica, commonly known as the rubber plant, rubber tree, or rubber fig, is a popular houseplant prized for its lush, glossy, dark green leaves and relatively low-maintenance care requirements.
Native to the tropical regions of Southeast Asia, these plants belong to the Moraceae family.
In their native habitat, these houseplants can grow up to 100 feet tall, but when grown indoors as houseplants, they typically reach a manageable height of 6 to 10 feet. The name “rubber plant” comes from the white, milky latex in the plant’s leaves and stems, which was once used to produce a form of natural rubber.
Rubber plants are also known for their air-purifying qualities. They can filter certain toxins from the air, improving indoor air quality. This, combined with their aesthetic appeal, makes them a common choice for indoor greenery.
Their large, leathery leaves create an immediate visual impact, and they can thrive in various lighting conditions, making them versatile for decorating different spaces in a home or office.
These plants also produce small fig-like fruits in their natural habitat, but this is unlikely to occur when they’re grown indoors. However, with the proper rubber plant care, which involves providing adequate light, maintaining the right temperature and humidity, and watering correctly, these tropical beauties can become a long-lasting part of your indoor plant collection.

Importance and benefits of having a rubber plant
They not only bring a vibrant touch of greenery into your home or office but also come with a host of benefits and importance that go beyond their aesthetic appeal:
Air purification: As mentioned earlier, one of the most notable benefits of having these houseplants is their air-purifying properties. According to studies conducted by NASA, they effectively remove toxins like formaldehyde from the air, improving indoor air quality.
Boosts mood and reduces stress: Like many houseplants, they can help reduce stress and enhance mood. Caring for plants can be therapeutic, providing a sense of achievement as plants grow and thrive. The lush, green foliage can also create a calming atmosphere that promotes relaxation.
Easy to care for: Rubber plants are known for being relatively low-maintenance compared to other houseplants. They can tolerate various indoor conditions and, once established, require only minimal attention. This makes them an ideal choice for both novice and experienced plant owners.
Adaptable to various light conditions: Although rubber plants prefer bright, indirect light, they can adapt to lower light conditions, making them versatile for different spaces in your home or office.
Long lifespan: They can live for many years with proper rubber plant care, making them a long-term addition to your indoor plant collection.
Increases humidity: These houseplants, like other indoor plants, increase humidity in the air through transpiration. This can be beneficial in dry indoor environments, potentially helping to alleviate dry skin and respiratory issues.
Non-toxic to pets: Although it’s always advisable to keep plants out of reach from pets, they are considered non-toxic to cats and dogs. However, the milky sap can cause skin irritation, so handling it carefully is still essential.
Understanding the basic needs of rubber plants
Understanding the basic needs of these plants is crucial for their healthy growth. These tropical plants are relatively low maintenance but require specific care to thrive.
Light requirements: They prefer bright, indirect light. They can adapt to medium light, but their growth may slow, and their leaves might lose some of their rich colors. In addition, direct sunlight can scorch the leaves, so placing them where it will receive filtered light is advisable.
Temperature range: They thrive in a temperature range between 60°F and 75°F. They can also tolerate higher temperatures, but avoid sudden temperature changes or exposing the plant to cold drafts, as they can cause leaf drop.
Humidity preference: Being native to tropical climates, they appreciate higher humidity levels. However, they can adapt to the typical humidity levels found in most homes.
If your environment is arid, you should increase humidity around your plant by misting it, placing it on a tray with pebbles and water, or using a humidifier.
Watering needs: Rubber plants prefer their soil to be kept consistently moist but not soggy. Water your plant thoroughly, then allow the top inch of soil to dry out before watering again.
Overwatering can lead to root rot, a common issue with houseplants. When plant growth typically slows during winter, reduce your watering frequency.
Soil needs: A well-draining potting mix is essential for rubber plants. This prevents water from sitting in the ground, which can lead to root rot. A combination of regular potting soil with some perlite or orchid bark usually works well.
Fertilization: They appreciate being fed during the growing season (spring and summer). Use a balanced, water-soluble houseplant fertilizer, and follow the package instructions to avoid over-fertilizing.
Reduce or stop fertilization during the cooler, darker winter months when the plant’s growth slows.
Meeting these basic rubber plant care requirements will help ensure they stay healthy and vigorous, adding a tropical beauty to your indoor space.
A step-by-step guide to planting a rubber plant
Properly planting these houseplants is essential to ensure it grows well. Here is a step-by-step guide to doing so:
Step 1: Choosing the right pot and soil
Firstly, select a pot with good drainage holes at the bottom. This will allow excess water to escape and prevent waterlogging.
They prefer well-draining soil to avoid root rot. Use a standard houseplant potting mix and add perlite or coarse sand to improve drainage.
Step 2: Preparing the pot
Place a piece of screen, a coffee filter, or a few small stones over the drainage hole to prevent soil from washing out. Then, fill the pot about 1/3 full with the potting mix.
Step 3: Placing the rubber plant
Take your plant and place it in the pot. The top of the root ball should be about an inch below the pot’s rim to allow space for watering.
Step 4: Adding soil
Fill around the plant with the potting mix, lightly packing the soil to eliminate any air pockets. Ensure the plant is upright and centered, but avoid burying the stem in the ground.
Step 5: Watering
After planting, water thoroughly until water comes out of the drainage hole. This ensures that the root ball is adequately moist and settles the soil.
Step 6: Finding the right spot
Place the newly potted plant in a location with bright, indirect light.
Top Tips for Successful Planting
- Do not overfill the pot with soil; leave some space at the top to make watering easier and prevent water spillage.
- Ensure the pot is large enough to accommodate the plant’s current size and allow some growth.
- If the roots were tightly packed or ‘root bound’ in the original pot, gently tease the roots apart before planting.
- After planting, keep an eye on the plant to ensure it’s adjusting well to its new pot. If you notice drooping or yellowing leaves, it may need more or less light or water.
Routine care for rubber plants
Keeping them healthy involves routine care that addresses its fundamental needs. Here are some key aspects to consider:
Watering: They prefer that their soil be kept consistently moist, not waterlogged. Water your plant thoroughly, then allow the top inch of soil to dry out before watering again.
In the cooler months or lower light conditions, reduce your watering frequency, as the plant’s growth slows down and uses less water.
Feeding: During the growing season (typically spring and summer), feed your rubber plant with a balanced, water-soluble houseplant fertilizer every 2-4 weeks.
Follow the instructions on the packaging to prevent over-fertilizing, which can cause salt build-up in the soil and damage the plant.
In the fall and winter, you can reduce or stop fertilizing, as the plant’s growth slows down during these seasons.
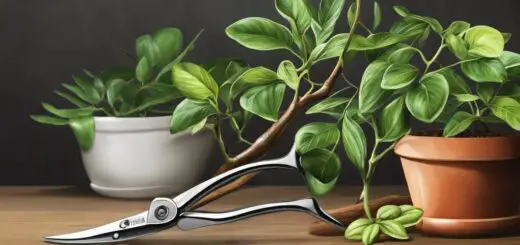
Pruning and reshaping: These houseplants can grow quite large, so regular pruning helps to control their size and shape. Use clean, sharp pruning shears to remove long or leggy branches at the desired length.
You can also remove any yellowed or fallen leaves. Make your cut just above a leaf node, where a leaf joins the stem. This will encourage more branching and fuller growth.
Cleaning the leaves: Dust can accumulate on the plant’s large leaves, reducing the plant’s ability to photosynthesize effectively. Regularly clean the leaves by gently wiping them with a damp cloth.
This not only keeps the plant looking its best but also helps to prevent pests.
Monitoring and maintaining humidity levels: They can adapt to various humidity levels but prefer a humid environment. If the air in your home is dry, consider using a pebble tray, a humidifier or regularly misting the plant to increase humidity.
Light adjustment and positioning: Keep your plant in a spot that receives bright, indirect light. If the leaves become pale or the plant becomes leggy, it may need more light.
Conversely, if the leaves appear scorched or faded, they might get too much direct sunlight.
Routine rubber plant care is about observing your plant and responding to its needs. Remembering these care tips, ensure your plant remains vibrant and attractive in your home.
Troubleshooting common rubber plant problems
They are generally hardy, but like any houseplant, they can experience a few common problems. Here’s a guide to identifying and troubleshooting these issues:
Yellowing leaves: Overwatering is a common cause of yellow leaves in rubber plants. Check the soil moisture levels and adjust your watering schedule as necessary. The top inch of soil should be dry before watering again.
If the yellow leaves are lower and the plant is otherwise healthy, it could be a regular part of the plant’s aging process.
Dropping leaves: Sudden changes in temperature, light, or location can cause the plant to drop its leaves. Ensure the plant is in a spot with stable conditions.
Also, remember that some leaf drop is natural, especially among the lower leaves. However, if you notice a significant amount of leaves falling, it might be due to overwatering or underwatering.
Root rot: This is often a result of overwatering or poor drainage. If the plant appears unhealthy and the roots are mushy and dark, root rot could be the problem.
You must remove the diseased roots and repot the plant in fresh, well-draining soil. Make sure the new pot has adequate drainage holes.
Pest problems: They occasionally suffer from mealybugs, aphids, and spider mites.
Signs of a pest problem include:
- Sticky residue on the leaves or surrounding surfaces.
- Tiny webs.
- Visible insects on the plant.
You can treat most pest problems with insecticidal soap or a mixture of water and mild dish soap.
Leggy or sparse growth: If your plant is becoming leggy or the leaves are spaced far apart, it could be due to insufficient light. Move the plant to a brighter location but avoid direct sunlight, which can scorch the leaves.
Browning leaf tips: This can be caused by several factors, including low humidity, over-fertilizing, or tap water with high fluoride or chlorine content. Increase humidity around the plant, cut back on fertilization, or use filtered or distilled water for watering.
Propagating a rubber plant
Propagating these plants can be exciting and rewarding. One of the most common propagation methods for this plant is through stem cuttings. Here is a step-by-step guide:
Materials You’ll Need:
- A healthy rubber plant
- A sharp, clean knife or pair of pruning shears
- A pot with drainage holes
- Potting soil or a soilless mix like perlite or vermiculite
- Rooting hormone (optional)
Steps for Propagation:
Choose a healthy stem: Find a healthy, mature stem on your rubber plant with several leaves. Ideally, it should be a long stem from which you can take several cuttings.
Take a cutting: Using your clean knife or shears, cut below a node (the spot where a leaf connects to the stem). Each cutting should be about 6-8 inches long and have at least two leaves.
Prep your cutting: Remove the lower leaf from each cutting, leaving at least one leaf at the top.
Apply rooting hormone: While this step is optional, applying rooting hormone to the cut end can increase the chances of successful rooting. Dip the cut end in the rooting hormone powder, shaking off excess.
Plant the cutting:
- Fill a pot with fresh potting soil or your chosen soilless mix.
- Make a hole in the center with your finger or a pencil.
- Place the cut end in the hole and firm the soil around it.
Care for your cutting: Water the cutting lightly to moisten the soil and settle it around the cutting. Place the pot in a warm spot with bright, indirect light. Keep the soil moist but not waterlogged.
Wait for roots to form: Rooting may take a few weeks or months. You’ll know roots have started when you see new leaf growth.
Transplant if necessary: Once your cutting has established a healthy root system, it can be transplanted into a larger pot.
Final Thoughts
Rubber plant care: Rubber plants, with their lush foliage and striking presence, make an impressive addition to any indoor plant collection. Although they require specific care and conditions to thrive, their hardiness and adaptability make them suitable for novice and experienced plant owners.
By understanding their basic needs, promptly addressing potential problems, and learning how to propagate them, you can enjoy the beauty and benefits of these plants in your home.
Remember, observing your plant and responding to its needs is the key to successful plant care.