Garden Hose Leaking At Collar: Fix It Now
A leaking garden hose collar can be a common issue that leads to water wastage and disrupts your gardening routine. The good news is that you can quickly repair it with some essential tools and patience. Whether it’s a minor leak or a major one, the solution could be as simple as using a hose clamp or waterproof tape or replacing the collar.
We’ve crafted an in-depth blog post to guide you through the process. This comprehensive guide takes you from understanding the anatomy of your garden hose and identifying the problem to fixing the leak. You will also learn handy tips to prevent future leaks.
Whether you’re a seasoned gardener or a beginner, you’ll find our post informative and easy to follow. Continue reading to restore your garden hose to perfect working order and make your gardening tasks smooth again.
Common Issue of Garden Hose Leaks
Garden hose leaks are a frequently encountered problem for gardeners and homeowners alike. They can happen for various reasons and cause significant water wastage if not addressed promptly.
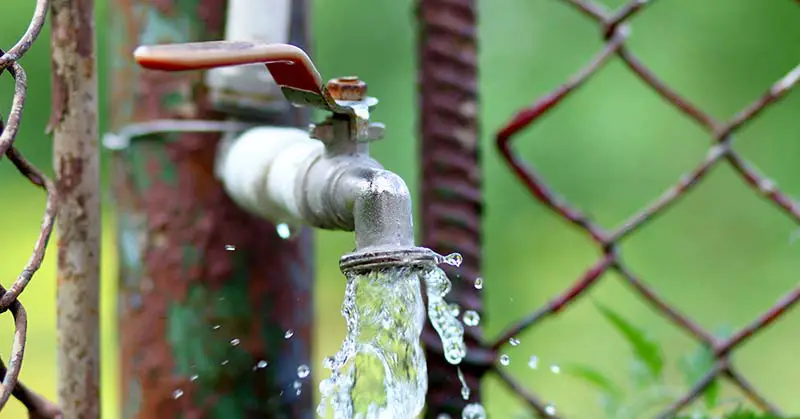
The typical leakage points are often at the connections – where the hose attaches to the tap, sprinkler, or nozzle – and at the collar, which is a crucial part of the hose’s structural integrity.
The collar is the hose part that reinforces the connection between the hose and its fittings. When the collar starts to leak, it is usually due to wear and tear, damage, or a poor-quality hose. A leak at this point can be challenging to manage, as water tends to spray out under pressure, making it tough to identify and repair the source of the leak.
This is a frustrating problem as it wastes water and reduces the efficiency of your watering system, be it for a garden, lawn, or even washing your car. In the following sections of our blog post, we will explore ways to identify, repair, and prevent leaks at the collar of your garden hose.
Addressing Leaks at the Collar of a Garden Hose
Addressing leaks at the collar of a garden hose involves:
- Understanding the problem.
- Gathering the necessary tools.
- Following a systematic approach to repair or replace the faulty part.
The process can seem daunting initially, but with the proper guidance, even a novice can handle it effectively.
Firstly, you’ll need to identify the leak at the collar accurately. To do this, disconnect the hose from any attached appliances, then turn on the water and observe where the water is escaping. If it’s leaking at the collar, the water will typically spray or drip from this area.
Once you’ve determined the collar is the issue, assess the extent of the damage. If it’s a minor leak, it could be fixed with waterproof tape or a hose clamp. You may need to replace the collar or even the entire end fitting for more significant leaks.
Gathering the right tools is crucial. A standard list of tools for this job includes a wrench, a new hose collar or fitting (if replacement is necessary), waterproof tape, hose clamps, a utility knife, and safety gloves.
Finally, the actual repair or replacement process begins. This involves cutting off the damaged section if you’re replacing the fitting or securing the leak with a clamp or tape if it’s a minor leak.
How Leaks Can Waste Water and Disrupt Garden Care
Leaks in a garden hose can cause significant water wastage and disrupt your gardening routine. A small, consistent leak can add up to hundreds of gallons of water over time. This is not only an environmental concern but can also inflate your water bills unnecessarily.
Regarding garden care, a leak in your garden hose can affect the water pressure, reducing the effectiveness of sprinklers or other attachments that require a certain pressure level to function correctly. This means your plants may not receive the optimal amount of water they need, potentially affecting their health and growth.
Furthermore, a leak can create unwanted wet spots in your garden or lawn, leading to overwatered areas that can harm specific plants or grass. It can also result in soil erosion, causing an uneven garden surface, and in the worst cases, it could even contribute to foundation issues if the leak is near your home’s structure.
Leaks, therefore, while seemingly minor, can have considerable direct and indirect impacts. It’s essential to address any hose leaks promptly to ensure the well-being of your garden and conserve water. Our blog post offers detailed guidance on tackling this issue effectively and preventing future leaks.
Recognizing Signs of Collar Leaks
Recognizing the signs of a leaking hose collar is crucial in resolving the issue quickly and efficiently. Here are some symptoms you should be on the lookout for:
Water Spraying or Dripping from the Collar: This is the most obvious sign of a leak. When the water is turned on, you may notice water escaping from around the collar, either as a steady drip or a spray.
Reduced Water Pressure: If there’s a leak in the hose, especially at the collar, it can result in a noticeable drop in water pressure. This could affect the performance of sprinklers or other attachments that require a specific pressure to operate effectively.
Constant Wetness Around the Collar: Even when the hose is not used, you might notice persistent wetness or dampness around the collar area, indicating a slow but consistent leak.
Visible Damage to the Collar or Hose: This could include cracks, fraying, rusting on metal parts, or other signs of wear and tear that could lead to a leak.
Unusual Swelling of the Hose near the Collar: This could indicate that the collar is not sealing properly, allowing water to infiltrate the layers of the hose and cause it to swell.
Conducting a Leak Test: Step-by-step Guide to Confirm a Leak
Conducting a leak test is a straightforward process that can help confirm whether your garden hose leaks at the collar. Here’s a step-by-step guide to performing a leak test:
Prepare Your Hose: Disconnect your hose from any sprinkler, nozzle, or faucet it might be attached to. This will help ensure that you’re only testing the hose and not any accessories.
Inspect the Hose: Before you start the test, visually inspect the hose, especially around the collar, for any apparent signs of damage, such as cracks, frays, or swelling.
Perform the Test: Connect the hose to a water source, turn on the water, and observe. A leak at the collar will typically cause water to spray or drip from this area.
Feel Around the Collar: With the water still running, carefully run your hand around the collar of the hose. If you feel water or notice your hand getting wet, this indicates a leak. Remember, the water might be under pressure, so be cautious not to injure yourself.
Shut Off the Water: Turn off the water once you have checked for leaks. If the leak is at the collar, it will be easier to work on fixing it with the water off.
Confirm the Leak: If you observed water escaping from the collar during your test, you have confirmed a leak. The next step will be to assess the severity of the leak and gather the tools required for repair.
Assessing Whether the Collar Can Be Repaired or Needs Replacement
Once you’ve confirmed that the leak in your garden hose is indeed at the collar, the next step is to assess the degree of damage. This is crucial to determine whether the collar can be repaired or needs to be replaced entirely. Here’s a simple guide on how to make this assessment:
Examine the Leak: Look closely at the collar while the water is turned on. Is it a minor drip or a significant spray? A little drip can often be repaired, while a considerable spray might necessitate replacement.
Inspect the Collar: Turn off the water and dry the area around the collar. Look for visible signs of damage, such as cracks, rust, or deformation. If the collar appears severely damaged, it will likely require replacement.
Check the Hose Near the Collar: Inspect the hose adjacent to the collar for signs of wear and tear, like fraying or swelling. If the hose itself is damaged near the collar, this could indicate that the entire end fitting (collar included) may need replacement.
Evaluate the Age and Overall Condition of the Hose: Older hoses or those exposed to harsh weather conditions are more prone to damage and might be more cost-effective to replace.
Consider the Leak Impact: If the leak is severe and has been causing significant water wastage, or if it’s affecting the water pressure significantly, replacing the collar or even the whole hose might be more practical to prevent future problems.
Enumerating Tools Required for Fixing a Leaky Collar
Fixing a leaky garden hose collar can be straightforward when you have the right tools. Here’s a list of essential tools and materials you’ll need to handle this job:
New Hose Collar or End Fitting: Depending on your damage assessment, you may need a new collar or a complete end fitting. Make sure to choose a fitting that matches the diameter of your hose.
Hose Clamps: These can secure a leaky collar, especially for minor leaks. Again, ensure they are the right size for your hose.
Waterproof Tape or Self-Amalgamating Tape: This can also be used for fixing minor leaks. It binds to itself, creating a waterproof seal when appropriately applied.
Adjustable Wrench or Pliers: These will be useful for removing the old collar or fitting and tightening the new one.
Utility Knife or Hose Cutter: A sharp tool will be needed to make a clean cut if you remove a damaged part of the hose.
Screwdriver: Depending on the type of hose clamp or new fitting you’re using, you may need a screwdriver.
Safety Gloves: To protect your hands during the repair work.
A Bucket or Towel: Useful for catching water that may drain out when working on the hose.
Highlighting Safety Guidelines when Working with These Tools
Working with tools, even for a seemingly simple task like fixing a garden hose leak, comes with certain risks. Here are some safety guidelines to follow when repairing a leaky hose collar:
Use Safety Gloves: Always wear safety gloves to protect your hands when handling tools or working with the hose, significantly when cutting or removing parts.
Turn Off the Water: Before starting any repair work, ensure the water supply is turned off. This reduces the risk of sudden water sprays, which can cause slips or wet your tools, creating a potential safety hazard.
Use the Right Tools: Using inappropriate tools for the task can lead to accidents. Always use the correct tool for each step. For instance, use a hose cutter or a sharp utility knife and the right-sized wrench for loosening and tightening fittings.
Ensure a Stable Working Environment: Make sure you have a stable, flat surface to work on. This can prevent any unwanted slips or falls during the repair process.
Avoid Force: If a collar or fitting is difficult to remove, don’t resort to excessive force, which can lead to slips and injuries. Instead, use penetrating oil to loosen it, or seek professional help if necessary.
Protect Your Eyes: If you’re cutting the hose or have a chance of water spraying, use safety glasses to protect your eyes.
Stay Aware of Sharp Edges: When cutting the hose or working with metal fittings, be mindful of sharp edges that could cause cuts.
Step-by-step Guide to Fixing a Leaky Garden Hose Collar
Fixing a leaky garden hose collar depends on the severity of the leak. Here’s a step-by-step guide for both minor and significant leaks:
For Minor Leaks
Turn Off the Water Supply: Always start by turning off the water supply to prevent any unexpected sprays or spills during the repair process.
Dry the Area: Dry the area around the collar to ensure a good grip and accurately locate the leak’s source.
Apply Waterproof Tape: Waterproof tape can often do the trick for a minor leak. Start by applying the video a few inches away from the leak and wrap it tightly around the hose, covering it and extending a few inches past it.
Secure with a Hose Clamp: You can add a hose clamp over the taped area for added security. Tighten the clamp until it’s secure but not deforming the hose.
Test the Hose: Turn the water back on and check to see if the leak has stopped. If it’s still leaking, you may need to add more tape and possibly another clamp or consider replacing the collar.
For Major Leaks or Damaged Collars
Remove the Old Collar or End Fitting: Carefully unscrew and remove the old collar or end fitting using an adjustable wrench or pliers.
Cut the Hose: Using a sharp utility knife or hose cutter, make a clean cut to remove the damaged end of the hose. Be careful only to cut off the necessary amount.
Attach the New Collar or Fitting: Insert the cut end of the hose into the new collar or fitting. It should fit snugly. Some fittings might have a clamp built-in which can be tightened using a screwdriver.
Secure with a Hose Clamp: If the new collar has no built-in clamp, secure it with an adjustable hose clamp. Again, tighten until it’s secure but not deforming the hose.
Test the Hose: Turn the water back on and check for leaks. If the collar is installed correctly, the leak should be resolved.
Prevention of Future Leaks
While it’s essential to know how to fix a leaky garden hose collar, it’s equally vital to understand how to prevent such leaks in the future. Here are some tips that can help you avoid this common problem:
Buy Quality Products: Investing in a high-quality garden hose and fittings can help prevent many issues. Quality hoses are typically more durable and better able to withstand wear and tear.
Proper Handling of the Hose: Avoid roughly pulling the hose, stepping on, or yanking it around corners. These actions can damage the hose and the collar over time.
Proper Storage: When not in use, store your hose correctly. Avoid leaving it kinked or under pressure, as this can lead to damage. Ideally, it should be stored on a hose reel or hanger, off the ground, and out of direct sunlight.
Regular Inspection: Make it a habit to inspect your garden hose and its fittings periodically. Look for signs of wear and tear or minor leaks, and repair them before they become significant problems.
Winterize Your Hose: If you live in an area with freezing temperatures, drain and store your hose indoors during the winter. Freezing can cause the water inside to expand, leading to cracks in the hose or fittings.
Use Washers: Use rubber or plastic washers at all connection points. They provide a water-tight seal and can prevent leaks.
Avoid Over-tightening: When attaching fittings, tighten until snug but do not over-tighten as it can cause damage leading to leaks.
Final Thoughts
Dealing with a garden hose leaking at the collar can seem daunting, but as we’ve shown in this blog post, it can be tackled with a little bit of knowledge and the right tools. Whether your leak is minor and can be fixed with waterproof tape or more severe and requires a complete collar replacement, step-by-step instructions can guide you through the process.
But remember, prevention is always better than cure. By investing in quality products, handling your hose correctly, and carrying out regular inspections, you can prevent future leaks and ensure the longevity of your garden hose.
We hope this guide has been helpful in not only solving your current issue but also preventing similar problems down the line.